Components needed to make a Java Webpage
In this lesson, we are going to make a webpage with Java. In order to make a webpage with Java, we need the below components to be installed on our computer.
- JDK (Java Development Kit) - It consists of everything that a Java developer needs to build a program. It contains JVM (Java Virtual Machine) and JRE (Java Runtime Environment). JVM is the java interpreter that translates the Java code into Bytecode and JRE is the runtime environment for the Java Programs
- IDE (Integrated Development Environment) - When we download JDK, we get everything to compile and run our Java programs. IDE provides a GUI development environment, where we can see the Program files, edit the programs, manage servers, and run the applications. Examples of Java IDEs are Eclipse, Netbeans, IntelliJ, etc
- Apache Tomcat Server - With JDK and IDE, we have everything to develop and run the Java applications, but we also have to deploy the application right? For that, we need the Apache Tomcat Server. So, Apache Tomcat Server is used to deploy the applications.
I am not going into further details of these components in this article. If you want me to make an article for this, please write to me at [email protected]. Let's see how to set up these components on our computer.
Follow the below steps to create a webpage for the first time.
Step 1: Set up the Java Development Kit (JDK)
JDK can be downloaded from Java SE (Standard Edition) Download as shown in the below image:
 |
| Java Standard Edition Download Page |
Clicking this will open a new page where you can find a list of installers for the different operating systems. Download any of them as per the operating system you are working on.
 |
| JDK Installers |
This will download the installer as shown in the below image:
| JDK Installer |
Running this will open the JDK installer wizard as shown below:
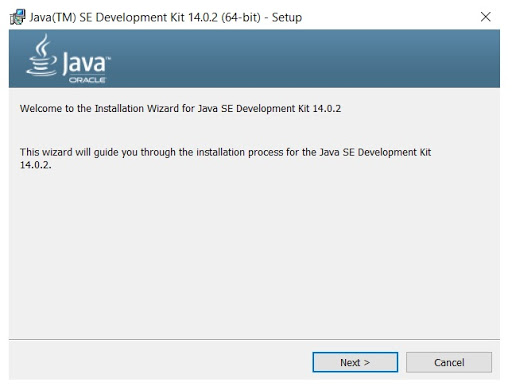 |
| JDK Installer Wizard |
Clicking on the next button will take to the next step where you can change the folder where JDK is to be installed as shown in the below image:
 |
| Screen 2 of the JDK installer wizard |
Clicking on next will start the installation as once it is done, you can see the below screen which can be closed.
 |
| JDK Installation Wizard Completion Screen |
Step 2: Set up the Integrated Development Environment (IDE)
Well, I use Eclipse IDE to develop the Java Programs, you can use any other IDE like IntelliJ or Netbeans.
You can download the Eclipse installer from www.eclipse.org. This URL will take you to the below page:
 |
| Eclipse IDE Download Page |
 |
| Eclipse Downloads Mirror Selection Page |
This will download the installer as shown below. Run the installer which in turn opens the installer wizard:
| Eclipse Installer |
The installer wizard will be like below:
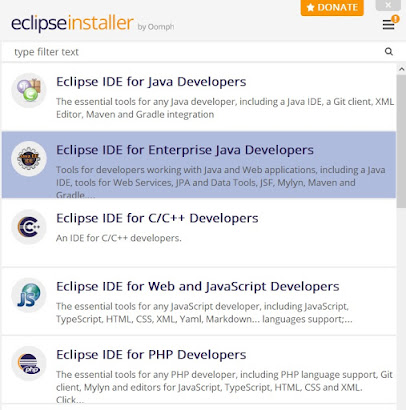 |
| Eclipse Installer Wizard |
As shown in the image, select the second option which is Eclipse IDE for Enterprise Java Developers. This will take you to the second screen as shown below:
 |
| Eclipse Installer |
Click on the install button and it will start the installation. This is all we need to do to install eclipse on our computer.
Step 3: Let's create a Webpage
Open Eclipse and below screen will be displayed where we have provision to change the workspace path. But use the default workspace as shown below:
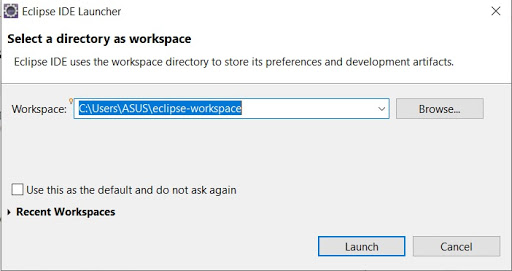 |
| Setting Workspace |
Clicking on Launch will open the eclipse screen as shown below:
 |
| Eclipse IDE start screen |
Click on create a new Java EE Web Project or navigate to File > New > Dynamic Web Project, it will open the below screen where you can set the Project Name and the server:
 |
| New Dynamic Web Project |
Till now, we have not installed apache tomcat, so Target runtime needs to be set as none for now. After naming the project, click on the finish button, this will create a project as shown below:
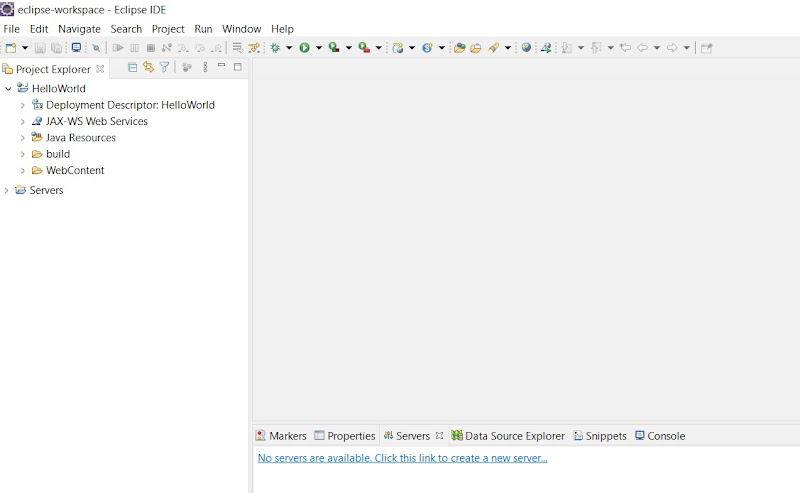 |
| Eclipse Project Explorer (If not visible navigate to Window > View > Project Explorer) |
Inside the WebContent folder, create a new folder named views and add a JSP page to it as shown below:
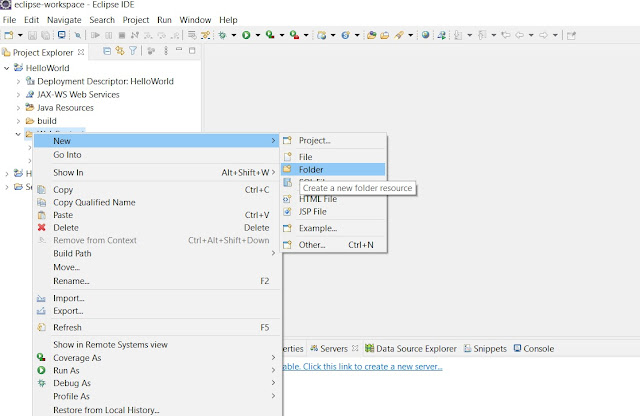 |
| Creating New Folder inside WebContent |
I have named this folder as View. After creating the folder, add a JSP page inside it. JSP pages are the Java Server Pages which can container HTML, CSS, Javascript as well the Java Code
 |
| Adding New JSP Page |
Name the JSP page as you wish and clicking on the Next button will give you the option to select the HTML version, by default it will be HTML5. I don't want to change the HTML version, so I will name it and click on the finish button
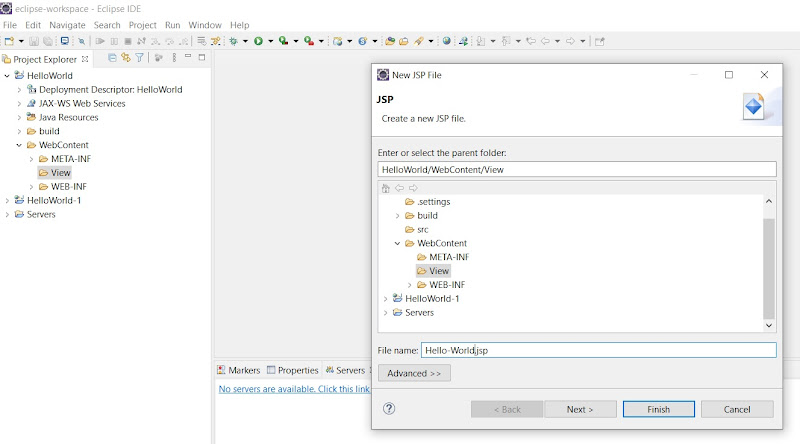 |
| Naming JSP File |
The JSP page will look like the below image, I am going to add <h1>Hello World</h1> to the page as shown below:
 |
| JSP Page |
After making changes to the HTML code, save it. The next step is to view this page on a browser. For that, we need an apache tomcat server.
Step 4: Setting up the server
Download Apache Tomcat from tomcat.apache.org. This URL will open the below page and download Tomcat 9 as eclipse does not allows adding Tomcat 10 as of now.
 |
| Apache Tomcat Homepage |
Clicking the Tomcat 9 link will open the below page:
 |
| Tomcat 9 Download Page |
Now, extract the downloaded zip file and you can place them wherever you want to.
Now, go to eclipse and navigate to Windows > View > Servers, to see the servers window as shown below:
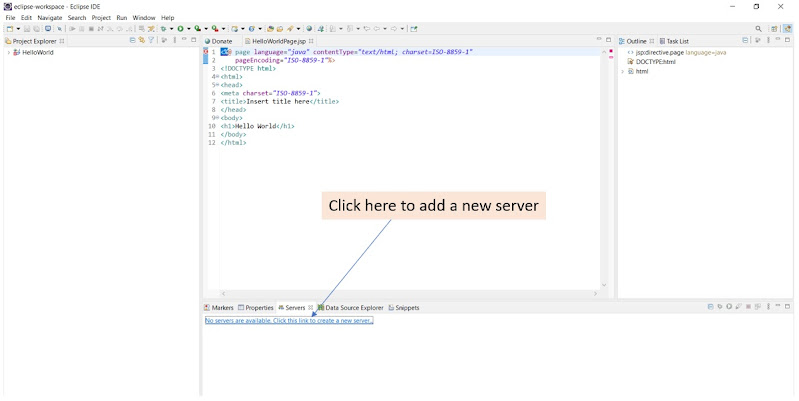 |
| Creating a new server |
On clicking the create new server link, it will open a window as shown below:
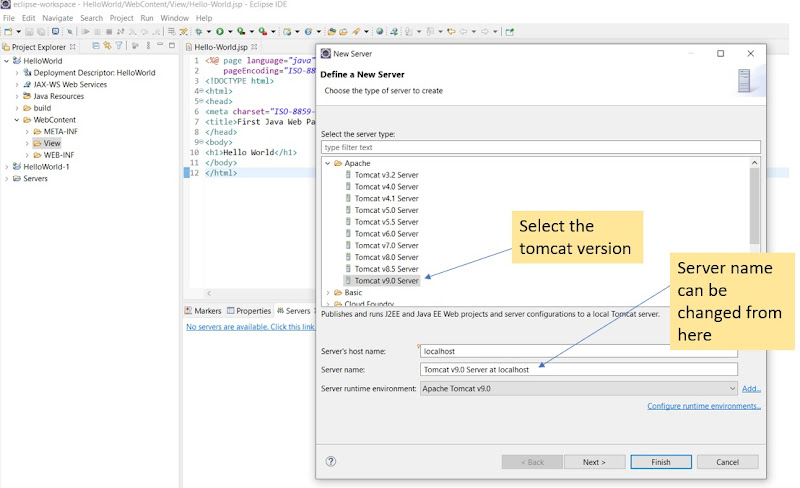 |
| New Server Dialogue Box |
On clicking Next, it will take to Add and Remove screen, from where add the project which we want to run as shown below:
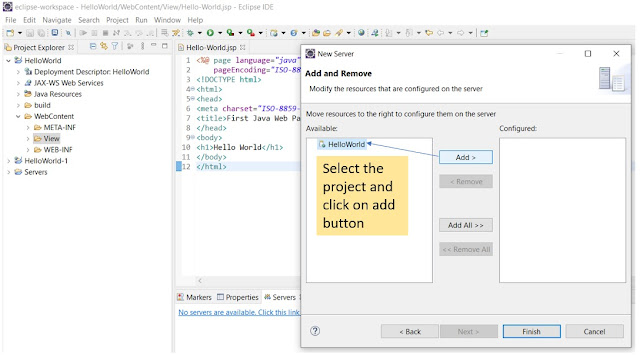 |
| Adding Projects to the Server |
After adding the project, click on the finish button, you can now see the new server in the server window as shown below:
 |
| Tomcat 9 Server |
Step 5: Run the JSP Page
Right-click on the JSP page that we have created and navigate to Run As > Run on Server as shown below:
 |
| To run the JSP page on Server |
This will open a server selection window, select the server that we have created and click on the finish button as shown below:
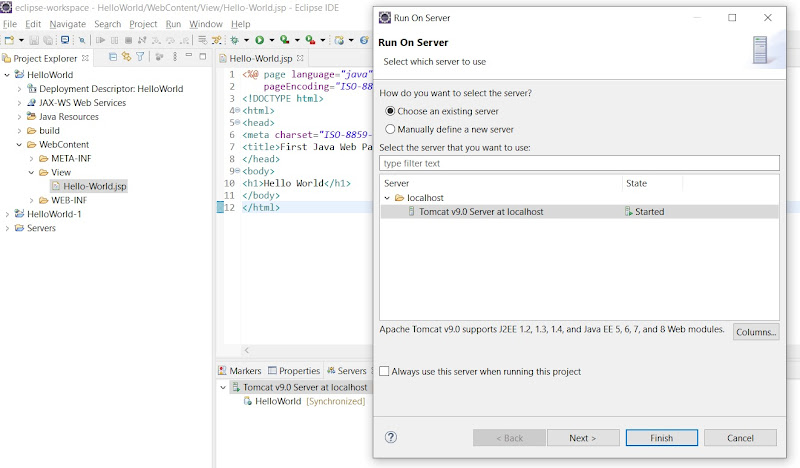 |
| Server Selection window to run the page |
Your windows defender may block this from running which will show a popup from where you can allow this to run.
Following these steps will show you the output as shown below:
 |
| Output Window |
Step 6: Set this page as a landing page
If you want to see this page while running the project, add below code in the web.xml file and run the project by following the same steps that we did for the JSP page
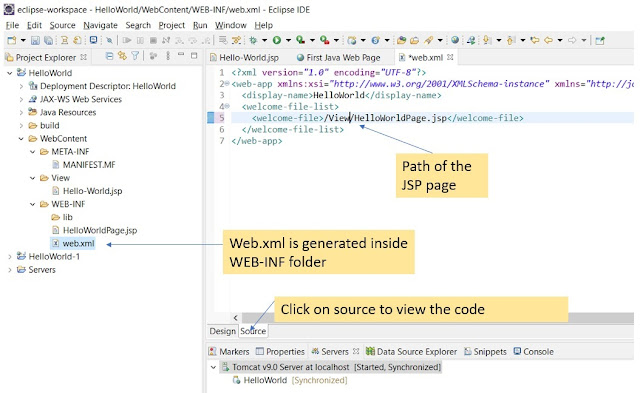 |
| web.xml file |
If web.xml is not there, then you have to generate it manually. To do this, right-click on the project and navigate to Java EE Tools > Generate Deployment Descriptor Stub, the file will be generated inside WEB-INF.
Changing Port
If you face any problem running the application on the port 8080, we can change it from the servers window as shown below:
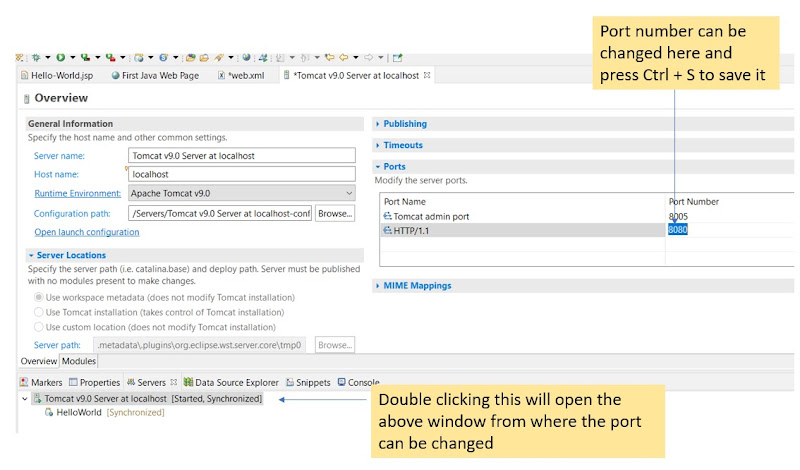 |
| Changing the server port to run the application |
I Hope, you understood how to create a webpage with Java. For any queries, you can write to me at [email protected]. To get notified for the releases, subscribe through email. If you found this article useful, please share it. Thank you 😊.
